Tuesday, June 26, 2012

Facial Time

I set a goal for myself this year to get at least six professional facials done, this weekend was number three. I go to Ulta since they carry the Dermologica product. 

I got introduced to this product a few years ago when a friend of mine traveled to Australia. I was instantly convinced that I should try out this product, just by seeing her before and after results. After some research, I discovered that it was an up and coming product in the states and certain Ulta stores carried the product. Unfortunately, none of those stores were close to me. Then after a weekend trip to my hometown, I decided that I was going to get a professional facial done at this really classy spa. When I walked into the spa, I saw they too carried the Dermalogica products, but were not for retail sale. I remembered that there was an Ulta store in my hometown that carried Dermalogica, so I went soon after and purchased a few products.

I must say I really love what this product does. It rejuvenates my face, makes it feel baby soft. Years later I finally set up to get a Dermalogica facial at Ulta. The benefit of this was that I would get a Face Mapping performed during my facial. The Face Mapping basically divides your face into zones and tells you what are your problem areas and what you can do. Here's a link to get an idea of what Face Mapping can do for you. After getting my Face Mapping done, I realized that the skin on my face is sensitive. This is something I knew but didn't really consider that I should be using sensitive skin products. After regular facials, my face would have blotches of red all over. Since I never considered that my face would need sensitive skin products, I thought the red blotches were normal after effect. 

My facialist recommended I try the UltraCalming Treatment Kit from Dermalogica. I have not seen red blotches on my face since I've been using this product.

These are my must have products:


The best part of Dermalogica, is that they have products to remove makeup. I purchased the Soothing Eye Make-Up Remover after my facial and used it last night to remove my make-up and it worked great! It's not like other eye make-up removers that I've used in the past, that would leave my face oily. I didn't wash my face with all the cleaning products, I simply used a moist facial sponge and put some remover and used circular motions to remove the make-up from my face. My face felt very clean, just as if I had washed my face with all the Dermalogica products.

I recommend Dermalogica to everyone, it's worth the money and will leave amazing results. I normally don't use it everyday, but tried using it everyday for about two months before my wedding and it left me with a flawless complexion.

Thursday, June 14, 2012

Manicure Time

I recently took off my acrylic nails and I'm attempting to grow out my natural nails. I've been giving myself manicures just about every other week. I had acrylic nails on since I was 13 years old and before then I never thought about manicures, so I'm pretty much new to this.

When I decided that I was going to grow out my natural nails, it was a decision that was not hard to make. I've been preoccupied with other important goals in my life and found that my nails would grow out and it had been over a month since I got my acrylics refilled. Part of the reason I got my acrylics was because I have a bad habit of bitting my nails. Since I took them off, that habit still lingers but not as badly as I thought it would be. I try to keep my nails constantly painted and keep them with a fresh new color.

Since I didn't really know anything about painting and taking care of my natural nails, I pretty much bought some cheap polish and and an "acrylic" base. When I painted my nails, without giving myself a proper manicure, the polish kept chipping. I was re-touching my polish everyday, about twice a day sometimes. I thought that chipping nail polish was something normal on natural nails, but a friend informed me that the cheap nail polish and acrylic base coat could be having a bad reaction and that I should invest in a good brand. So I took her advice and bought myself some Essie products for my nails.

I recently purchased a cuticle oil from Essie called Smooth Trick.
{Essie}

This cuticle oil is meant for dry, brittle nails. I put some on my cuticles after I've soaked my nails in warm water. My cuticles tend to get dry once the nail starts to grow, so with this deep-conditioning oil, I'm hoping that i helps restore some of that missing moisture. I should probably invest in some good hand moisturizer also, since this cuticle oil is meant to be put on without nail polish.

I've purchased two different base coats: Grow Stronger and Grow Faster.
{Essie}

I started first using Grow Stronger, which is recommended for soft, weak nails, and since my nails are still brittle from the acrylic nails, they are very soft and weak. Now I can feel that the new nail growing in is very strong, but I still have the very weak, brittle nail on the tips, so my concern is to have my nails grow out so I can have strong nails. The Grow Faster base coat is for healthy, normal nails and I feel that the nail by my cuticle is healthy enough to work efficiently.

Then there is my recent obsession with buying nail polish.
{Essie}

I have only six Essie polishes right now and I can't make a trip to the drug store without looking for another polish to add to my collection. I don't have any wild colors since my job restricts me to shades of red, pink, and beige. My only down fall with these limited color options is that the  color coral in for the summer and that is not one of my allowed colors. So for work purposes I have to stick to a "pink" coral. I was obsessed a few weeks ago with painting my nails this color and I found Essie's "Cute as a Button" which is a pinkish-coral and luckily I had no issues.

After I paint my nails with two coats of nail polish, I complete my look with my top coat, Essie's No Chips Ahead.
{Essie}

Can you tell that I didn't want my nail polish to chip? I've been using for about a month and it's been working pretty good, I haven't had to retouch my nail polish everyday and while chipping is normal, it tends to happen after a week or so.

Now my only complaint after this entire process is that my nail polish sometimes get little air bubbles that are easily visible to someone looking at them up close. Now the only thing I can think that would make this happen is one of two things, my drying methods. Now, I have two drying methods and I can't say I've done one and not the other. A few years ago my mom bought Creative's "Dry & Shine" finish, that you are suppose to put on top of your finish nails about one to three minutes of drying. Its suppose to help dry your nail polish quickly and I've heard of how this does work. This is a very old product, because I can not find it one Creative's website. The second drying method I've done is in between polish coats, I will blow dry my nails, so the polish can dry. I've used hot and cold air to blow dry my nails.

For right now, I will continue to give myself manicures until the weak, brittle nail grows completely out. Then I will start going to the nail spa to get a manicure, just to see what else I should be doing to my nails. 

Some essential products that I have at home to give myself a manicure include: cuticle nipper, cuticle pusher/cleaner, nail file, and buffing block. All of these products can be purchased at your local drug store.

Do any of you have any tips or tricks you do when giving yourself a manicure? Share them below in the comments, I would love to get some helpful tips.

Tuesday, June 12, 2012

Vow Renewal

I just got married, still a newly-wed, and I'm already thinking about renewing my vows with my husband. I love him very much and would remarry him everyday of my life. My wedding was a dream come true, I just feel like I have more princess fairy tales to live out with my husband. 

I've already made note that our five year anniversary will fall on a Saturday, making that a 'perfect' time to renew our vows. I wouldn't want a big celebration like our wedding was, I'd want something more personal and private. 

I love my wedding dress and I love the color pink. While my dress was not pink and I would never trade it for any other dress in the world, I have fallen in love with a Vera Wang Blush Organza Wedding Dress from David's Bridal! The price is also very affordable compared to my wedding dress. It would be the 'perfect' vow renewal wedding dress!


Absolutely Stunning! 

My only alteration would be to make the neckline a sweetheart. 

Like I said, I'd want this renewal to be a more private, personal celebration. I'd want to have just immediate family and a few close friends, but the actual renewal, I'd want just me and him and our children, if we have any by then. No bridesmaids or groomsmen, just us. Our family and friends would be waiting for us at the celebration brunch. 

I would want to have the 'reception' at a restaurant, where we could reserve a small space. There wouldn't be any DJ or entertainment like our wedding had, just some iPod music in the background, while we all dine and celebrate five years of love.

I would want a 'centerpiece table' where I would display a small cake and some other sweets. I'd want this table to be filled with pink and gold. 

I came across a pink and gold 50th Birthday celebration, that had many of my ideas.


Wow! I honestly can tell you I thought of all these ideas! Even the PINK chocolate fountain! To see more pictures from this event, visit Little Big Company to see all the beautiful details.

I would want to hire our amazing wedding photographer's from Brooke Images to capture the nuptials and some details from the celebration.

It sounds like it would be a big celebration, but in reality, it wouldn't. The guest list would be around 20 people and compared to the 84 guest we had at our wedding, that is a relatively small guest list for our family. 

Maybe next time we could celebrate in our hometown or who knows, we could go back to where we originally tied the knot or somewhere else. All I know for sure is, if I have the chance to do it, that dress is the one, (actually, the second one).

Wednesday, June 6, 2012

Summer Wear

I love to go shopping! It's probably one of my favorite hobbies. With summer rapidly approaching I thought I'd put together some summer looks to guide me when shopping for styles this season. Since I'm from Florida, I like to take advantage of the heat and wear lots of dresses, shorts and of course bathing suits.

I've come across many predesigned fashion styles on Pinterest and wondered how I could put them together. I found out that Polyvore is the website that allows you to create fashion looks, so I decided that this would be perfect to show you some great styles to wear this Summer. 

I hope you enjoy and get a chance to create your own styles from this Summer on Polyvore.

'Summer Days'
Summer Days
{Polyvore}

'Beach Bum'
Beach Bum
{Polyvore}

'Just Hanging'
Just Hanging
{Polyvore}

'Lunch Date'
Lunch Date
{Polyvore}

'Hello Sunshine'
Hello Sunshine
{Polyvore}

Monday, June 4, 2012

Gender Reveal Party Ideas


I'm always thinking about party planning, whether it's about how I would celebrate a birthday or how I would want my wedding to appear if I could re-marry my husband every anniversary. I came across some beautiful Rice Crispy Treats dipped in Pink Chocolate and thought how fabulous this would be to have at a baby party!

I don't have any kids right now, but I love to plan ahead for when that day comes. One of the newest upcoming trends is to have a Gender Reveal Party. When I have the chance to participate in this celebration I would like to have lots of blue and pink decorations. I would make my family and friends guess whether I will have a boy or a girl with some fun games.

By the time this party is given, the expecting mother should know herself what the gender of her unborn child is, but if the expecting mother chooses to be surprised herself, then that is also a great option. I'm not sure what I'll want to do, maybe I could do both options since I want more than one child. 

The key items to have at this celebration are food and entertainment. Here are some treats you can include.

Rice Crispy Treats

Donuts

Cake with gender color filling

Cake Ball Stuffed Chocolate Chip Cookies

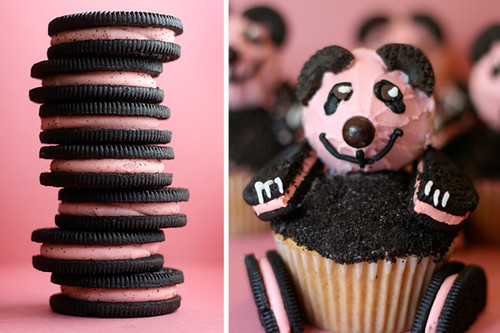
Strawberry Oreo/Pink Panda Cupcakes

Macarons

Yummy! All of these treats would work wonderfully! Especially the cake, since that would 'reveal' to your guest (and to the expecting mother, if she doesn't know) the baby's gender.

Be sure to have plenty of blue and pink decorations like balloons and streamers, and also have some games, so your guest can take 'sides' on a certain gender.


{Joy is at Home}

The ideas are endless, but the main idea is to have fun with it! This party is a gathering with loved ones to celebrate a new life and family.

If you have ideas or have been a part of a celebration like this, I would love to hear all about it! I love receiving feedback from all my readers! 

Sunday, June 3, 2012

'Centerpiece Table' Party Decorations

When I was younger, I never understood why my mom would buy 'random' party items just to store them in the garage and used them later. Now that I'm getting older, I find myself wanting to do the same thing!

My thought about buying party supplies in advance is that it helps save money. If I buy the supplies now, I won't have to spend money to buy it when I need it and just buy other essentials, like food and beverages.

It seems like what is in style now at parties is to have a 'centerpiece table' as I like to call it. This is where the cake is or the sweets are located. The 'centerpiece table' is the main attraction at the party and could be decorated as creatively as possible. It doesn't need to bare sweets at all, it could be a table set up for a buffet of some sort, maybe mimosas or salty snacks. Whatever is set up there, is to catch the attention of the guests, hence 'centerpiece table'.

For anyone looking for some decoration ideas for a young girl's birthday party, here are some ideas and supplies to help get you started.

I came across a 'DIY Pink Princess Party' pack by Lauren Haddox Design on Etsy.


Included with this 'DIY Princess Party' Pack is an invitation JPEG or PDF, water bottle labels, menus, a banner plus so much more! Check out her Etsy page for more details.

I have also seen beautiful white cake stands on the 'centerpiece table'


For just $27, you can purchase this set of 3 ivory cake stands from JAF Gifts on Amazon. Made out of metal, they fit 7', 9' and 10' cakes or multiple cupcakes or whatever you chose to display. 

If you prefer something low key that you can display some cookies or macarons on, then you might be interested in these Porcelain Rectangle Platters from Target. A set of 2 platters cost  $17. They both measure 10 x 5.75 x 1.1 and are dishwasher-safe.


Thinking about displaying a candy bar? Then these Apothecary Jars from Save on Crafts will look beautifully on your 'centerpiece table'.


Currently on sale, get all three jars for $20.

Lastly, we don't want our guests to be thirsty after eating all these sweet treats, so whether you choose to have some pink lemonade or white sangria for the adults, this Beverage Dispenser from Target will help complete the look of your 'centerpiece table'. Made completely of glass and can hold up to 5 liters, this item cost $21.


All these items listed above will cost around $115, but the beauty of this, is that all these items can be reused, hence saving you money for any and all future events.

Now, I don't know about you, but for me, it might be time to start doing some of those silly ideas my mom had about buying party supplies and storing them in the garage.

Saturday, June 2, 2012

Cake Balls

Today was my co-worker's baby shower and I wanted to make something sweet to bring. I made some cake balls for mother's day and they were a big hit with our families so, I thought why not give it another shot? 

They are a little taste of heaven in a ball. 

One of my favorite activities to do is baking. I even tried to open up my own bakeshop, but somehow making a hobby into work didn't make it fun anymore. So, I turn to baking only for special occasions or when I have time.

Me and my husband both have sweet teeth, but mines can't resist a sweet temptation. Yet, I'm proud to say that out of the 50 cake balls that I made today, I only had one. 

Since this treat is so sweet, I decided to share the recipe.


Covering the cake pan with butter and flour, should allow
removing the cake from the pan to be clean and easy.


You don't have to weigh the cake balls,
but I like things to be the same, so I weighed
my cake balls and kept them within a 0.8-1.0 ounce range.


This is what the cake ball will look like when you place it
upside down on the parchment paper.
Just added some more Candy Melt to cover the 'hole'
Remember to add sprinkles before the Candy Melt starts to dry.


Cake Balls

  • 1 box of Red Velvet Cake Mix
  • 3 eggs
  • 1 1/4 cups of Water
  • 1/3 cup Vegetable Oil
  • 1 Cream Cheese Whipped Frosting
  • 1/4 cup Sweetened Condensed Milk
  • 3 bags of Wilton Candy Melts
  • Sprinkles 
* You will also need: cake pan, large mixing bowl, large spoon, parchment paper, 3 cookie sheets, butter and flour.

1-  Turn oven on to 350 degrees (for dark cake pans, heat oven at 325 degrees)
2-  With an electric mixer, slowly whip eggs until blended. Gradually add water and vegetable oil. Stop mixer and add half the Cake Mix until blended and then blend in remaining Cake Mix.
3-  Butter a cake pan and add 2 tablespoons of flour to the pan. Shift around the flour to completely cover the butter. Add more as needed. Remove excess.
4- When the Cake Mix is completely blended, and appears smooth, stop mixer and add to cake pan.
5- Bake for 35 minutes. Remove cake from oven and let cool for 30 minutes.
6- Remove cake from pan and add chunks to a mixing bowl, with a large spoon, mix cake until its crumbs.
7- Add Frosting and Condensed Milk to crumbs, use a large spoon and mix until well blended.
8- Line cookie sheets with parchment paper. Form small balls of cake mixture about once inch in diameter. Place cake balls on 2 cookie sheets lined with parchment paper.
9- Place cookie sheets into the freezer and freeze for 40 minutes.
10- Remove one cookie sheet out of the freezer and place second one in refrigerator.
11- Add Candy Melts into a large mixing bowl and heat in microwave for one minute. Remove, mix, heat for and additional 30 seconds and mix until well blended.
12- Place one cake ball into the mixing bowl of Candy Melts. With a fork add melted Candy Melts on top of cake ball until completely covered.
13- Lift cake ball with fork, remove excess Candy Melt, and place on the 3rd lined cookie sheet upside down.
14- Add some Candy Melt to cover exposed cake areas on cake balls.
15- Add sprinkles before moving on to the next cake ball.
16- Repeat with 2nd cookie sheet adding melted Candy Melts onto now empty 1st cookie sheet, until all cake balls are covered with Candy Melts and sprinkles.
17- Place cookie sheet back into freezer for approximately 10 minutes for Candy Melts to rapidly dry.
18- Enjoy!
(Yields about 50 Cake Balls)